한국어
In Part 1, we covered the Mail Plus (1) Package Installation (2) Package Settings within the Synology NAS.
In Part 2, try setting up a domain to use your Mail Plus.
First, you need to know the external address of the actual NAS to connect to the domain. The NAS will naturally be connected to the shareer and using internal IPs assigned by the shareer, but external IPs must be set up to connect to the domain. Internal IP can be checked immediately if DDNS service in Synology is used. It is assumed that the external address is 111.111.111.1111.
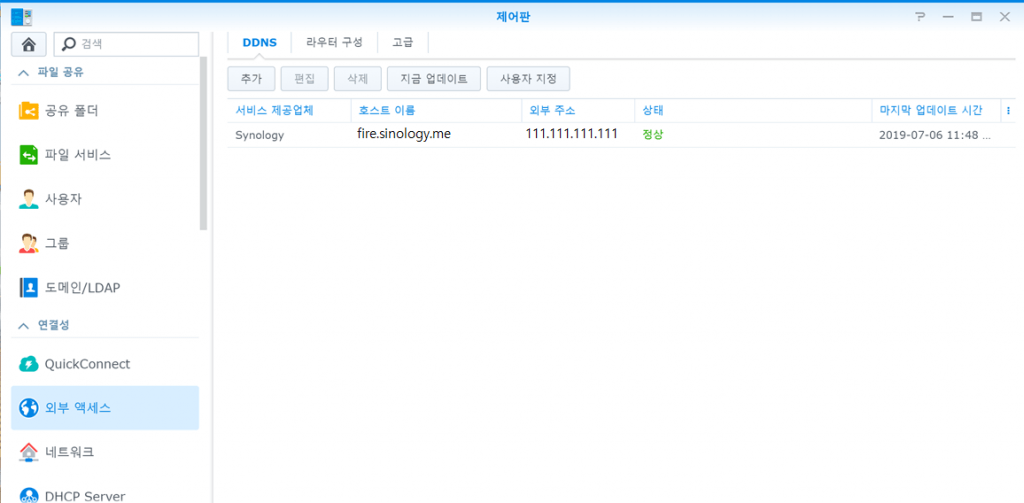
It was confirmed that the external address was 111.111.111.1111. Now you have to go to the site where you joined the domain and manage the domain. Here we assume that the domain was created in Gavia and describe it by Gavia standard.

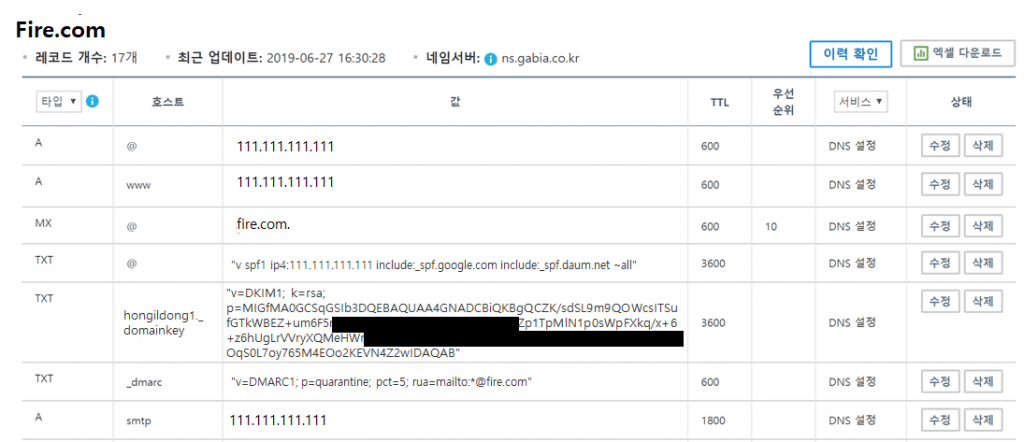
The Gavia admin screen shows that the DNS management tool is below. (Most domain sites have a similar interface.)
Let me explain all types of settings here one by one.
First, Assuming that you are new to domain DNS setup, I will explain it as simple and easy as possible.
*Type
It is convenient to think that type is the type of work in DNS settings.
Type A tells the IP4 address for a given host and is used to convert the domain name to that IP address. In addition, for AAAA type, IP6 address is given by CNAME, ISDN is given by the host’s ISDN address, MX is given the name of the mail exchange server, and TXT shows a specific string. This is a setup for mail server deployment, so I erased other settings and left only the necessary settings. Use A, MX, and TXT here.
*Host
Hosts are friends in front of the domain. Usually referred to as subdomain. For example, if the host is small enough, it means that it will proceed with the setup of mail.fire.com @The letter @means nothing, WWW means writing a message in front of the domain.
*Value
Of course it means the value for the type concerned. For example, a value of 111.111.11.1111 for Type A @host means moving to 111.111.111.11 when you type fire.com I’ll do the details in the settings below.
*TTL
TTL stands for Time To Live, which means the seconds the cache remains if the name server receives a query value for DNS. Simply put, if TTL is set to 600, it will take 10 minutes to actually apply when the DNS record value is changed. If set to 3600, the renewal cycle is 1 hour, which is not appropriate for testing. It is recommended to extend the TTL for a long time after the deployment is complete and normal operation is verified.
The explanation of the concept is over. Now, let’s start setting it up.
1) Set A record – A, @, 111.111.111.11 (external IP address)
The reason for setting the A-code is that mail sent from a domain that does not have an A-code set is recognized by the other mail server as spam! I have a lot to explain, but I’ll explain it like this.
2) Setting A record – A, www, 111.111.11.1111
1) Same as number one
3) Set up MX record – MX,@, fire.com. This should be referenced previously when setting up the mail server. If your mail server has a hostname of fire.com (if you are using @back fire.com in your email address), you must enter fire.com. in its MX record value. The caveat here is to print a . (finish) after the domain. Even if you don’t take a picture, it won’t You can do what the setup says.
4) TXT record (SPF setting)
be of great importance. It is also the most confusing and difficult thing to do in setting up a mail server. I have a lot to explain, but let’s write it down as shown above.
“v=spf1 ip4:111.111.111 include:_spf.google.com ~all”
Look behind Include here. It contains _spf.google.com and _spf.daum.net This SPF is a kind of mail-in policy, and mail sent from a domain that does not have a mail-in policy is recognized as spam in other mail! Therefore, some people say that when building a mail server, the mail server must be registered with KISA as a whitelist. However, if you are deploying a “fixed IP” with NAS, KISA can be registered, but most of you are using “liquid IP” and therefore will not be whitelisted with KISA. In this case, a small offset is to bring in the spf policy of other sites. Here we have drawn Google and Daum’s policies. With this setting, you can check that your e-mail is going well with Naver.
5) TXT record (DKIM setting)
DKIM is one of the Mail Security policies behind the SPF. Fortunately, the Synology Mail Plus server supports DKIM.
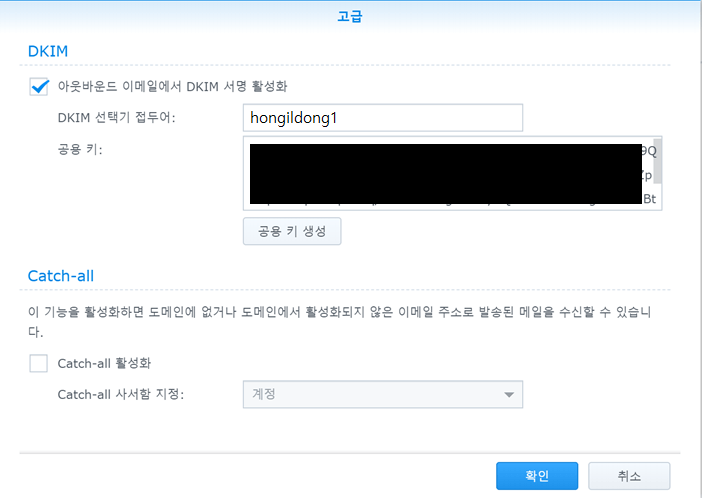
Check the activation of DKIM signature in DKIM and write down the desired prefix in the selector prefix. We made a prefix called hongildong1. And after creating the public key, press OK.
Later on, [Prefix] on the host.Write down the _domainkey.
Write the value as follows.
v=DKIM1; k=rsa; p=[Public key generated above]
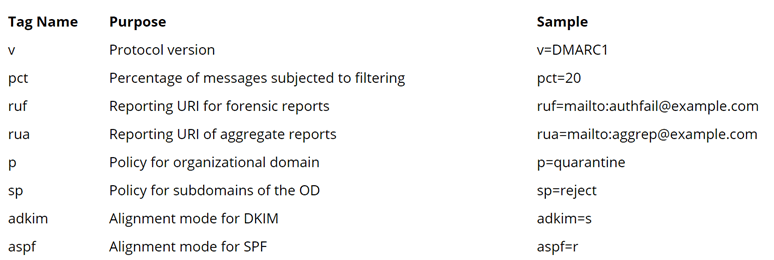
6) TXT record (DMARC setting)
As with SPF and DKIM, it is understandable that the security settings are used to send and receive mail. We will decide how to filter mail using various policies ranging from SPF set before DMARC setup to DKIM, except for options on SPF or DKIM, we will proceed with the DMARC report. It is recommended that you adjust your options later on by performing outgoing and incoming tests. First, the values set here are as follows.
v=DMARC1; p=quarantine; pct=5; rua=mailto:report@fire.com
There are several options for DMARC. Let’s look at the options below and change the settings later.
Once the setup has been completed to this point, the domain setup is considered to have been completed first. Finally, there is an easy way to verify that the domain settings are successful.
Once you’ve accessed https://mxtoolbox.com and entered your domain, you can diagnose problems with your mail server.
When all of these domain settings are complete, they should be sent out as normal. (Please!)
In the following posts, the mail receiving and receiving tests are conducted
Series
- Synology NAS to set up mail server Part 1 (Mail plus installation, setup)
- Synology NAS to set up mail server Part 2 (DomainDNS, SPF, DKIM, DMARC settings)
- Synology NAS to set up mail server Part 3 (Certificate, Receiving Test)
- Synology NAS to set up mail server Part 4 (Using Smartphone Mail Application)
0 Comments